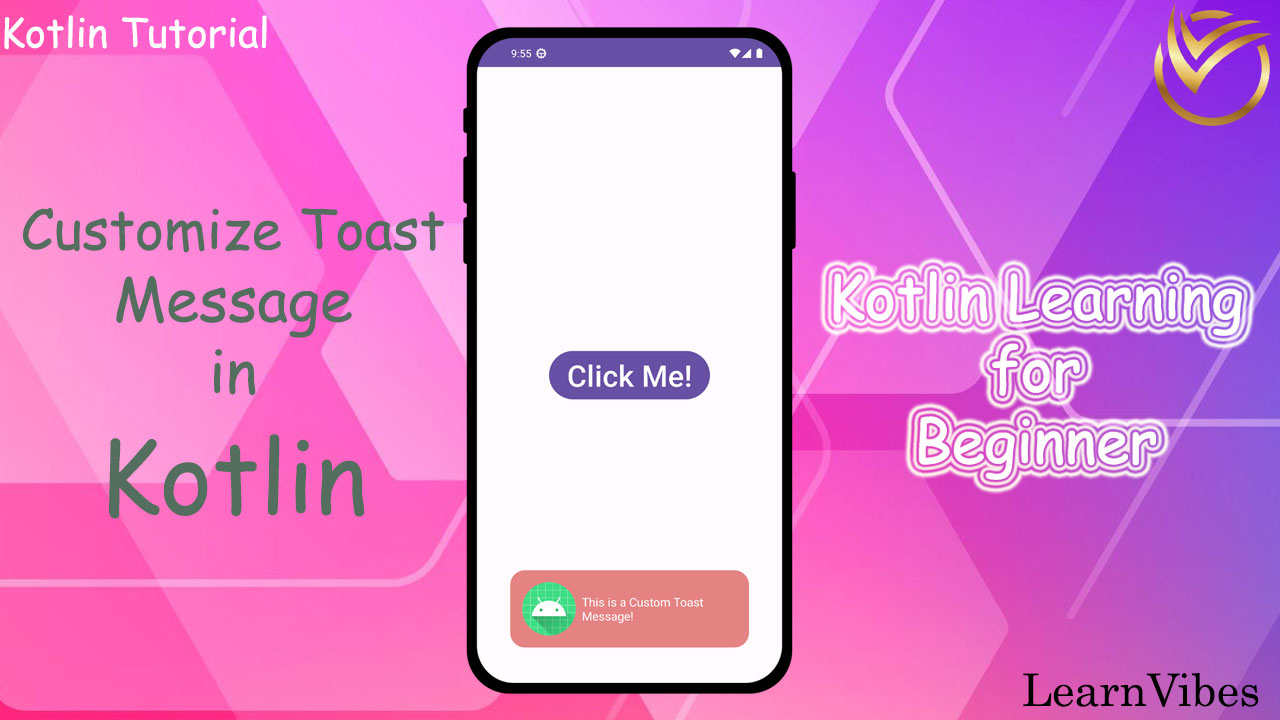
Snackbars play a crucial role in enhancing user experience by displaying immediate feedback on user interactions.
In this article, we will discuss implementing custom Snackbars using Java to differentiate them from regular ones. Custom Snackbars can be designed with unique layouts and styles to match the app's branding or aesthetic.
To create custom Snackbars in Java, follow these steps:
To create an empty activity Android Studio project with Java as the programming language, follow these steps:
Open Android Studio: Launch Android Studio on your computer.
Create a New Project: Click on "Start a new Android Studio project" or go to "File" > "New" > "New Project."
Choose Project Template: Select "Empty Activity" from the list of project templates. Make sure to choose Java as the programming language.
Configure Project: Set the name and location for your project. Choose the package name for your app (usually in reverse domain name format, like com.example.myapp).
Select Form Factors: Choose the form factors your app will support (Phone and Tablet). You can also select the minimum SDK version based on your target audience.
Add Activity: Click "Finish" to create the project. Android Studio will generate the initial project structure with an empty activity.
Step 2: Working with the activity_main.xml file
<?xml version="1.0" encoding="utf-8"?>
<RelativeLayout
    xmlns:android="http://schemas.android.com/apk/res/android"
    xmlns:tools="http://schemas.android.com/tools"
    android:layout_width="match_parent"
    android:layout_height="match_parent"
    tools:context=".MainActivity"
    tools:ignore="HardcodedText">

    <Button
        android:id="@+id/showSnackbarButton"
        android:layout_width="wrap_content"
        android:layout_height="wrap_content"
        android:layout_centerInParent="true"
        android:backgroundTint="@color/colorPrimary"
        android:text="SHOW SNACKBAR"
        android:textColor="@android:color/white" />

</RelativeLayout>
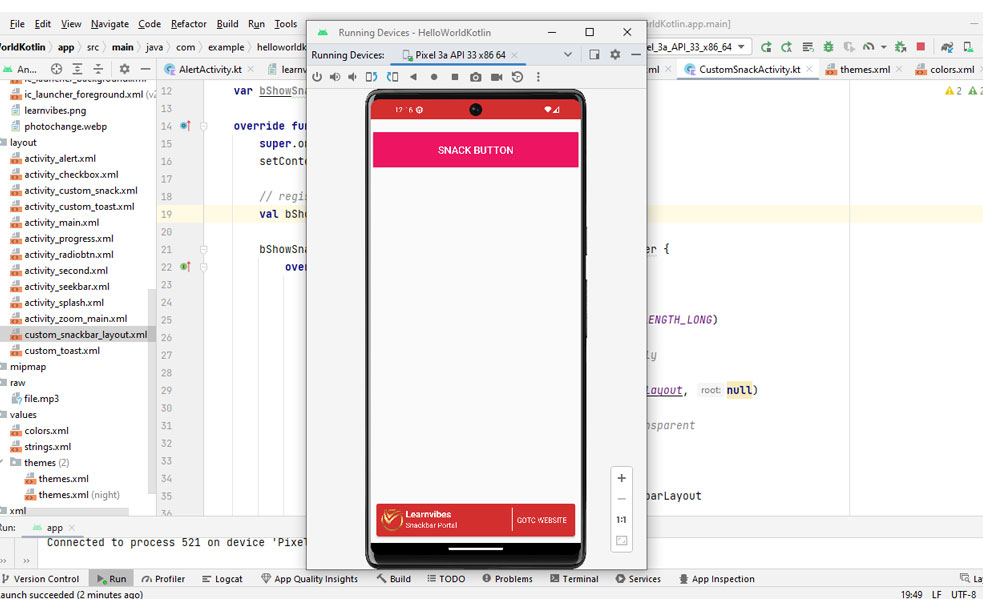
Step 3: Creating custom_snackbar_layout.xml file
Give the layout file a name, for example, "custom_snackbar_layout.xml," and click "OK."
Android Studio will open the XML editor for the new layout file. Design your custom Snackbar layout according to your requirements. For example:
<?xml version="1.0" encoding="utf-8"?>
<RelativeLayout
    xmlns:android="http://schemas.android.com/apk/res/android"
    xmlns:app="http://schemas.android.com/apk/res-auto"
    xmlns:tools="http://schemas.android.com/tools"
    android:layout_width="match_parent"
    android:layout_height="match_parent"
    tools:ignore="HardcodedText">

    <androidx.cardview.widget.CardView
        android:layout_width="match_parent"
        android:layout_height="wrap_content"
        android:layout_margin="8dp"
        android:elevation="4dp"
        app:cardBackgroundColor="@color/colorPrimaryDark"
        app:cardCornerRadius="4dp"
        app:cardPreventCornerOverlap="true"
        app:cardUseCompatPadding="true">

        <RelativeLayout
            android:layout_width="match_parent"
            android:layout_height="match_parent"
            android:padding="8dp">

            <ImageView
                android:id="@+id/imageView"
                android:layout_width="45dp"
                android:layout_height="45dp"
                android:layout_alignParentStart="true"
                android:src="@drawable/learnvibes" />

            <TextView
                android:id="@+id/textView1"
                android:layout_width="wrap_content"
                android:layout_height="wrap_content"
                android:layout_marginStart="4dp"
                android:layout_toEndOf="@id/imageView"
                android:text="Learnvibes"
                android:textAlignment="center"
                android:textColor="@android:color/white"
                android:textSize="18sp"
                android:textStyle="bold" />

            <TextView
                android:id="@+id/textView2"
                android:layout_width="wrap_content"
                android:layout_height="wrap_content"
                android:layout_below="@id/textView1"
                android:layout_marginStart="4dp"
                android:layout_toEndOf="@id/imageView"
                android:text="Snackbar Portal"
                android:textColor="@android:color/white"
                android:textSize="14sp" />

            <!--this view separates between button and the message-->
            <View
                android:layout_width="2dp"
                android:layout_height="45dp"
                android:layout_toStartOf="@id/gotoWebsiteButton"
                android:background="@android:color/white" />

            <Button
                android:id="@+id/gotoWebsiteButton"
                style="@style/Widget.MaterialComponents.Button.TextButton"
                android:layout_width="wrap_content"
                android:layout_height="wrap_content"
                android:layout_alignParentEnd="true"
                android:text="GOTO WEBSITE"
                android:textColor="@android:color/white"
                android:textSize="14sp" />

        </RelativeLayout>

    </androidx.cardview.widget.CardView>
</RelativeLayout>
Step 4: Working with the MainActivity.java file
import androidx.appcompat.app.AppCompatActivity;
import android.graphics.Color;
import android.os.Bundle;
import android.view.View;
import android.widget.Button;
import android.widget.Toast;
import com.google.android.material.snackbar.Snackbar;

class MainActivity : AppCompatActivity() {
    var bShowSnackbar: Button? = null
    override fun onCreate(savedInstanceState: Bundle?) {
        super.onCreate(savedInstanceState)
        setContentView(R.layout.activity_main)

        // register the button with appropriate ID
        bShowSnackbar = findViewById(R.id.showSnackbarButton)
        bShowSnackbar.setOnClickListener(object : OnClickListener() {
            fun onClick(v: View?) {

                // create an instance of the snackbar
                val snackbar = Snackbar.make(v, "", Snackbar.LENGTH_LONG)

                // inflate the custom_snackbar_view created previously
                val customSnackView: View =
                    layoutInflater.inflate(R.layout.custom_snackbar_view, null)

                // set the background of the default snackbar as transparent
                snackbar.view.setBackgroundColor(Color.TRANSPARENT)

                // now change the layout of the snackbar
                val snackbarLayout = snackbar.view as SnackbarLayout

                // set padding of the all corners as 0
                snackbarLayout.setPadding(0, 0, 0, 0)

                // register the button from the custom_snackbar_view layout file
                val bGotoWebsite: Button = customSnackView.findViewById(R.id.gotoWebsiteButton)

                // now handle the same button with onClickListener
                bGotoWebsite.setOnClickListener(object : OnClickListener() {
                    fun onClick(v: View?) {
                        Toast.makeText(
                            applicationContext,
                            "Redirecting to Website",
                            Toast.LENGTH_SHORT
                        ).show()
                        snackbar.dismiss()
                    }
                })

                // add the custom snack bar layout to snackbar layout
                snackbarLayout.addView(customSnackView, 0)
                snackbar.show()
            }
        })
    }
}