Implementing RadioButtons in Kotlin is similar to implementing them in Java. Here's a step-by-step guide to implement Android RadioButtons in Kotlin:
Step 1: Create the layout XML file (e.g., activity_radio_buttons.xml):
<LinearLayout
    android:layout_width="match_parent"
    android:layout_height="match_parent"
    android:orientation="vertical"
    android:padding="16dp">

    <RadioButton
        android:id="@+id/radioButtonOption1"
        android:layout_width="wrap_content"
        android:layout_height="wrap_content"
        android:text="Option 1" />

    <RadioButton
        android:id="@+id/radioButtonOption2"
        android:layout_width="wrap_content"
        android:layout_height="wrap_content"
        android:text="Option 2" />

    <RadioButton
        android:id="@+id/radioButtonOption3"
        android:layout_width="wrap_content"
        android:layout_height="wrap_content"
        android:text="Option 3" />

    <!-- Add a RadioGroup to group the RadioButtons together -->
    <RadioGroup
        android:id="@+id/radioGroup"
        android:layout_width="wrap_content"
        android:layout_height="wrap_content">

        <!-- Each RadioButton must have the same groupId (android:layout_width) -->
        <RadioButton
            android:id="@+id/radioButtonOption4"
            android:layout_width="wrap_content"
            android:layout_height="wrap_content"
            android:text="Option 4" />

        <RadioButton
            android:id="@+id/radioButtonOption5"
            android:layout_width="wrap_content"
            android:layout_height="wrap_content"
            android:text="Option 5" />

    </RadioGroup>

    <Button
        android:id="@+id/btnShowSelection"
        android:layout_width="wrap_content"
        android:layout_height="wrap_content"
        android:text="Show Selection" />

</LinearLayout>
Step 2: In your activity or fragment (e.g., RadioButtonActivity.kt):
import android.os.Bundle
import android.widget.Button
import android.widget.RadioButton
import android.widget.RadioGroup
import android.widget.Toast
import androidx.appcompat.app.AppCompatActivity

class RadioButtonActivity : AppCompatActivity() {

    private lateinit var radioGroup: RadioGroup
    private lateinit var btnShowSelection: Button

    override fun onCreate(savedInstanceState: Bundle?) {
        super.onCreate(savedInstanceState)
        setContentView(R.layout.activity_radio_buttons)

        radioGroup = findViewById(R.id.radioGroup)
        btnShowSelection = findViewById(R.id.btnShowSelection)

        btnShowSelection.setOnClickListener {
            showSelection()
        }
    }

    private fun showSelection() {
        // Get the ID of the selected RadioButton from the RadioGroup
        val selectedRadioButtonId = radioGroup.checkedRadioButtonId

        if (selectedRadioButtonId != -1) {
            // Find the selected RadioButton by its ID
            val selectedRadioButton = findViewById<RadioButton>(selectedRadioButtonId)

            // Get the text of the selected RadioButton
            val selectedOption = selectedRadioButton.text

            // Display the selected option using a Toast message
            Toast.makeText(this, "Selected Option: $selectedOption", Toast.LENGTH_SHORT).show()
        } else {
            // No RadioButton selected
            Toast.makeText(this, "Please select an option", Toast.LENGTH_SHORT).show()
        }
    }
}
Step 3: Register the activity in your AndroidManifest.xml file:
<activity android:name=".RadioButtonActivity" />
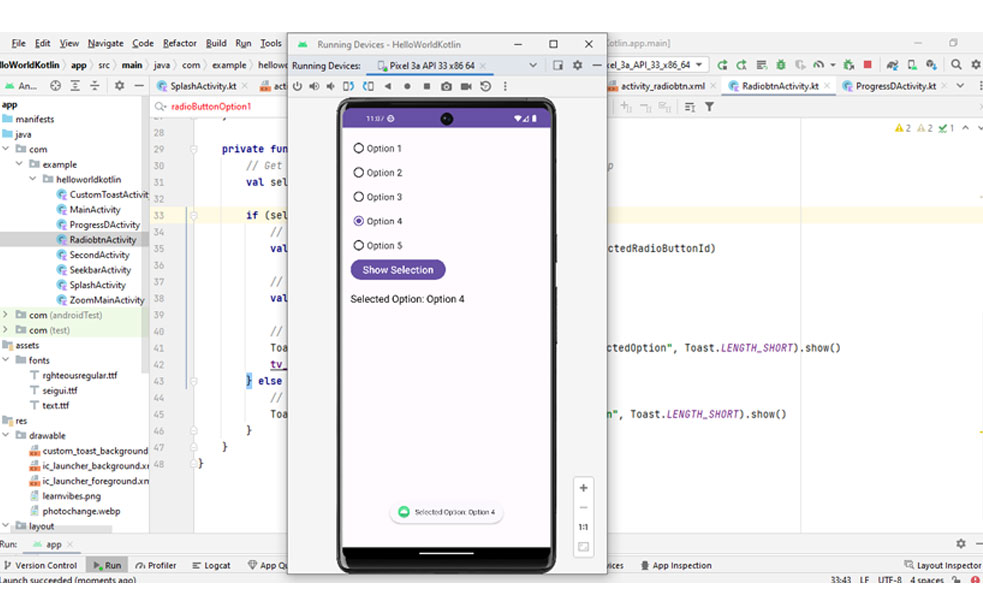
Now, when you run the app, you'll see a screen with several RadioButtons.
The user can select one option from the RadioGroup, and when they click the "Show Selection" button, the selected option will be displayed as a Toast message.